Tuesday, February 23, 2010

My Home Tour *Updated New Photos*

I got a good start yesterday on getting some pictures taken of our home.  I've been wanting to do this for quite some time and I am so thankful that Danielle over at Transforming Home for lighting the fire under me to get it done.  I missed her real life house tour linky party but I'll be sure to be ready for the next one.  I am still missing a few rooms, the master bedroom, master bathroom, family room, and full bath upstairs.  I hope to post those today as well, but nevertheless here are some photos to get your started.

We have only lived in this home for 2 years so we haven't yet put our stamp on each room. Some rooms have gotten a partial "stamp" though.  With that said  I will point out the things that I like/hate about each room and what I plan to do about it.

Dining Room
Recently I painted this room a shade of cream with green tones in it (think celedon).  Overall it just looks creamy.  We don't have a dining room table, nor do we really need one right now.  We used to have one, didn't like it, and never used it  so we use it as a wine room of sorts.  Eventually I would like to have a large dining room table but it just won't work in this room.  The chandelier will eventually be replaced as well.


Living Room
This room....oh this room....I just don't know what to do with it.  I am not thrilled with the furniture but can't replace them right now.  The walls have not been painted and there are no window treatments except for a nice pleated shade so it's very bare.  It connects with the dining room so I am thinking that I need to just continue the paint color from the dining room throughout this space.  I am just so clueless about colors that work with this furniture.  I also am not really making it a priority right now so it just exists "as is" which is sad because it is something you see right when you walk in the front door. 
oh yeah..don't you just love the tag left on the bells of ireland??  Nice.


Living Room/Foyer
This is the transition from living room to foyer. Hate that cord from the lamp, I bought cord covers to make it disappear but haven't gotten to it yet.


Foyer
 I have a call into a painter to come quote this thing!  You can't see it but there is an awful faux painting all over it done by the previous owners.  Maybe a marble type effect?  In any case it does nothing for the space.  It needs some sort of color to show off the beautiful woodwork done on the staircase and define the niche at the top.  I would love to be able to get that horrible brass chandelier down and give her a coat of oil rubbed bronze or black paint.  It's so high up and so large that I don't even know where to begin to get someone to get it down and then eventually put it back up for me.  Someday....


Half Bath
I painted this bathroom last year sort of a milk chocolate color.  I am ready to change it already.  I like it but I am now craving Gray!  There is a cool recessed ceiling with molding around the perimeter of the room too.  In the photos it looks like I have two tones of the brown paint however it's just shadows.  It's just painters white up there right now.  I need to learn a little more about paint and color and put the right one up there to coordinate with the wall color.  It's an odd little shape of a room, hard to photograph.


Kitchen
Aside from switching out my stove and diswasher to match the other stainless steel, I actually like this space.  I spend a lot...let me say that again...A LOT of time in here. 

This is the transition from foyer to kitchen (off in the distance is the entrance to the sun room which is up next) 


Sunroom (aka...the toy room)
I love love love this room....it's just that it's not mine right now, it belongs to my girls. Oh sure, I have a couple of wicker chairs and a small desk in there but that's it, the rest is theirs.  This room is an add on done by the previous owners, it was originally the back door to the patio.  This is what it looks like 90% of the time....the other 10% of the time it looks worse if you can believe that.  We are currently beginning the project of a basement finish so as soon as that is complete, we will rip out that storage bench (hopefully to use it down in the basement), paint, maybe add window treatments and furnish with some nice pieces.  I can't wait because I think this will be a really cool space. 


Guest Bedroom
This room is one of those rooms that falls under a lower priority category which is sad because it's such a sunny pretty room and afterall it is for "guests".  You'd think I would make my guests a higher priority.  I do have a plan for this room though.  I am NOT going to paint this furniture, I am going to leave the pine as is and work with it.  I am going to purchase this bedding.
I am going to add a couple of glass lamps and paint the room a nice neutral color, and of course add window treatments.  I can't wait to finish it...but in order to do that  that would actually require me to start it.


My Baby's Room
About 6 months ago this room was a white box.  It's a very small room so I think it's perfect for a childs room.  We painted (I will update with paint color when I look it up) and added beadboard.  I love it and hope it will remain timeless for the little guy as he grows up.


My Girls (twins) Room
This is the bonus room above the garage and is perfect for the girls.  When we moved in the room had a polar bear type mural on one wall and I needed to get rid of that so I quickly painted the room a very pale pink color.  I left the sky/cloud mural on the ceiling, which also included a red airplane.  That doesn't quite fit, but there wasn't any way for me to get rid of it so it stays for now.  Because the girls were still in cribs when we moved into this house I didn't quite go with any "theme" like I wanted to.  They have since transitioned into beds but still I have not given them any real "big girl"
 type decorating.  I hung their old curtains on a 2 inch valance rod that was already on their window when we moved it.  It looks awful and I plan to hang that rod that is in the corner but just haven't gotten to it (notice a theme here).  I did just have a baby in my defense but still.....I hate these things that are just left undone. 


The airplane..


Family Room
This room is pretty much done except for needing a little art on a wall or two.  The couch pillows, and mantel are contastly evolving with the seasons, but that is pure fun for me.  As you can also plainly see there are a couple of decor items that won't be around forever and that is the swing (with baby boy in it....he is using his sisters pink blankie to sleep with...he's secure in his manhood) and the jumperoo. 


Master Bedroom
I debated even showing this room...it's awful to me.  White bare walls, old bedding, shoes laying on the floor because there is no more room in our closet, mismatched leftover decor from other areas of the house.  We have a great lighted recessed ceiling.  No excuse not to make this into a great room.

  This second photo that shows the useless sitting area and the closet will hopefully serve as a "before" photo.  We hope to knock down the wall facing the sitting room and close that area off and make that whole thing a closet (windows will be inside the closet).  I'd put in some thin interior french doors that still allow some light into the room.  There is another window next to the bed that is pretty large so the room still gets plenty of natural light.  The other thing that this would accomplish is to give the room additional usable wall space, because as you can see we have a dresser back in the sitting area too.   It's about 3rd on our list of "big" re-do's. 


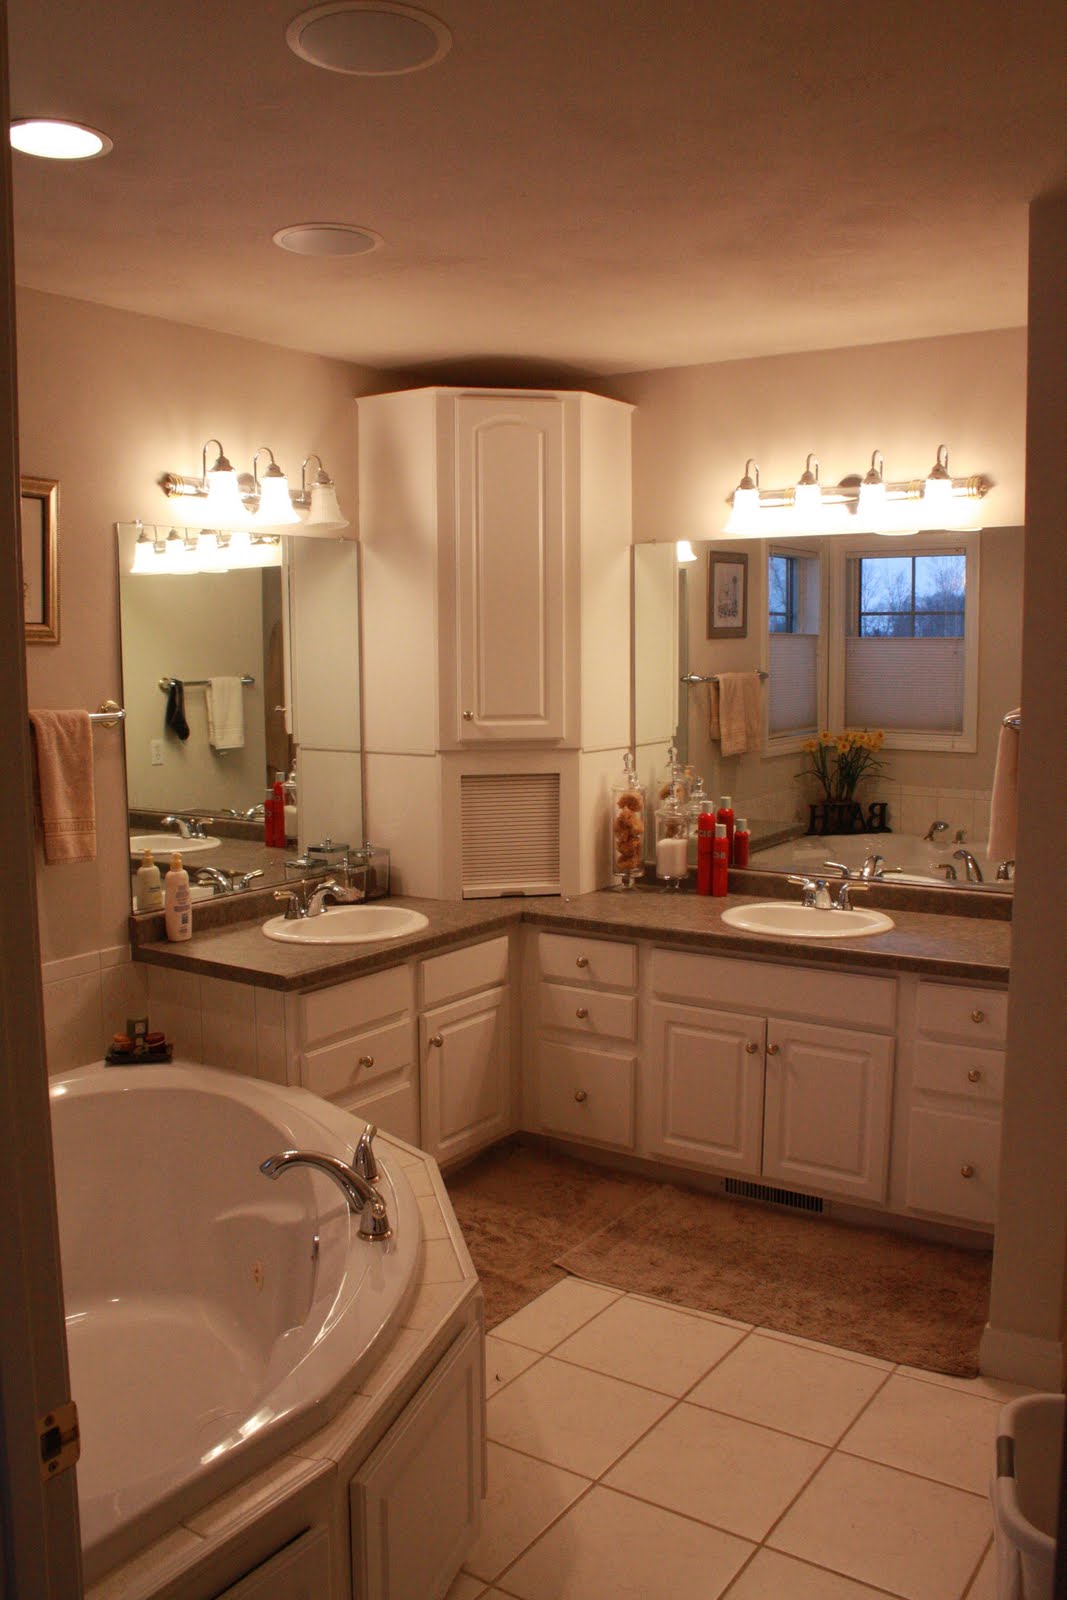
Master Bathroom
This will be the 2nd item we'll re-do after our upcoming basement remodel.  This bathroom could be so much better, the shower is tiny and behind the door, the bathtub is like the elephant in the room.  It takes up about 1/3 of the space and while it's a very very nice tub, we know that we can accomplish the same thing in about 1/2 that space.  The vanities meet in the corner and while that might seem nice, the pipes for the sinks run around the corner and were left uninsulated (this bathroom is above our 3rd car garage) and the first winter we were here, they froze and exploded into the garage.  In order to fix them the plumber had to cut out the inside of my husbands vanity.  We need new vanities so we'll be tackling this after the basement! 

.....stay tuned for another post on the "before" photos of our basement as we begin our basement refinishing!

Monday, February 22, 2010

No Sew Curtains Part II

Yesterday I finally finished the family room curtain.  Quite honestly I did not know what I wanted to do with this one so I just made a big rectangle out of my fabrics, hung it up and tried to decide.  I think I was originally wanting a relaxed roman shade look, however I think it's just a little too heavy for this unless I attach some loops on the fabric and eye hooks on the window.  I may try that some day but for now it ended up looking like this.  The ribbon is something I had on hand and looks ok, but I was thinking of maybe a black ribbon to match the trim fabric and maybe make it stand out a little.  I'm sure it'll be constantly evolving just like everything else in my house. 

I am still hoping to join Danielle over at Transforming Home for her Real Life House Party Tour

Kelly

Thursday, February 11, 2010

No Sew Curtains Part I

I fell in love with these Burlap Curtains that Jen over at Tatertots and Jello made.  She is so talented and I adore her blog.  I set out to use the same color scheme and style since I liked hers so much (clever huh?), but my problem was that I get so much sunlight in these windows that burlap was a just a little too transparent for me.   I decided to line them with the same material that I used to make my PB Pillows.  Doing this allowed me to actually be able to turn the curtains around and show the burlap side or the linen side.  I actually ended up liking the linen side with my kitchen better.
Here is the reverse side (too lazy to climb up and flip the rod around...sorry)

Here is the eat in kitchen.  I did not ruffle mine like Jen did because my material just didn't seem fluid enough to do it.  I tried but mine looked goofy.  I sort of like the simplicity here.

Part II of these curtains will be to make one for this window which is just off of the eat in kitchen area so I'm going to use the same fabrics.  The rod is already on the window so I'm going to use what is there.

These were made simmply with my hot glue gun.  I will post a tutorial on how I make the family room curtain, but for the others I followed Jen's great tutorial.  Thanks Jen!
.........Stay tuned for Part II

Linking up to:
Frugalicious Friday at Finding Fabulous

Wednesday, February 3, 2010

DIY Boxwood Topiary

After sitting on my mantel like this for a month or so...


I have finally made the boxwood balls into what I originally set out to do which are a pair of topiaries.  I wanted to be able to move the trees into different containers as seasons changed or even be able to set them on a pot just like the "before" photo when the mood struck.  In order to do this I needed to cement them into a portable container.  I decided a solo drinking cup and plaster of paris would do the job.  I mixed the plaster of paris according to the directions on the box and added it to the cups.  I then stuck the dowel into the plaster and held it with scotch tape.  The same scotch tape grid I used for making my Paperwhite arrangement.

Once the plaster was hardened, I stained the dowel a darker color.  The Boxwood ball itself was hollow so I needed a way to get it to stay on the dowel.  Luckily the ball was actually two halves with little snaps every so often to hold it together so I was able to unsnap it, add a styrofoam ball inside, and resnap it back together.  Now I was able to insert the dowel through the boxwood and into the styrofoam ball to secure it to the dowel.  Once secured I placed the tree into it's container.


I tucked a little bit of paper towel around the cup to make sure it didn't wobble.  I topped with moss to cover the cup and paper towels and added a little bit of linen ribbon to dress it up.  The mercury glass containers are adorable, I love them and snagged them for cheap at a Pottery Barn sale.


I am looking forward to different seasons where I can change them up a little bit with a different ribbon or container (especially Christmas).

Linking up to:

Show and tell at Blue Cricket Design
Make it Yours at My Backyard Eden
Get Your Craft On Thursday at Life as Lori
Frugalicious Friday at Finding Fabulous

Friday, January 29, 2010

Making a "Super Kid" Happy

This week one of my daughters is "Super Kid of the Week" at preschool.  This is a big deal dontcha know?  This week I also bought the new BHG magazine with these cute little cookies on the cover.
They sounded simple enough.  I didn't have a couple of things...one being the fluted edge cookie cutter so I just used a drab ole round one.  The other thing I didn't have was ground vanilla beans so I just scraped the beans out of a pod and also used vanilla extract on top of that.  Because she is super kid I thought that stars would be fun in the middle and I just so happended to have a 1" star cookie cutter from Christmas.   I'll post the recipe below, but honestly I didn't like making these.  The dough is really crumbly and hard to work with, the bottom cookies that are just plain ole circles ended up larger than the cutout cookies and since you are supposed to sandwich them together that doesn't work out too well.  I ended up having to literally cut the bottom cookies around their edges to make them work. 

But...........despite all of this, when they were complete, my daughter was over the moon happy with them.  I got a huge thank you and a big hug.  She cannot wait to take them school to give to her friends, along with about 10 things for show and tell.  It made it all worth it (but not so worth it that I wouldn't just buy a couple of rolls of sugar cookies next time :))


..for a little side fun, my little man just turned 4 months old the other day and I found a cute way to remember it.  Just making good use of my PB Pillows

Vanilla Dessert Sandwiches
(courtesy of Better Homes and Gardens)

Prep: 45 min  Bake 10 Min Per Batch
Chill: 30 Min.  Oven: 350 F
3 Cups unbleached all-purpose flour
2 tsp. cream of tartar
1 tsp. baking soda
1/2 tsp. salt
1 Cup unsalted butter, softened
1 1/2 Cups granulated sugar
2 Tbsp. milk
1 Tbsp. vanilla extract
1 tsp. pure ground vanilla beans* or 2 tsp. vanilla extract
   Vanilla sugar (scrape vanilla beans and put pods in sugar jar, store indefinitely)
1 recipe Vanilla Cream Cheese Frosting (below)

1.  In a medium bowl whisk together flour, cream of tartar, baking soda, and salt.  Set aside.
2. In a large bowl beat butter with an electric mixer on medium speed for 30 seconds.  Add granulated sugar and beat until smooth and creamy.  Beat in milk, vanilla, and ground vanilla. Beat in as much of the flour mixture as you can with the mixer.  Stir in remaining four mixture by hand.  Dough will be soft.
3.  Divide dough in half.  Cover and chill dough about 30 minutes or until easy to handle.  On lightly foured surface, roll half the dough at a time until 1/8 inch thick.
4.  Preheat oven to 350 degreesF. Using a 3-inch round cookie cutter, cut out circles from dough.  Using a 1-inch round cookie cutter, cut out circles from the centers of half the dough dircles.  Place dough circles on parchment paper-lined cookie sheets.  Reroll scraps, including the 1-inch dough rounds, and cut out additional dough circles as directed.  Repeat with the remaining dough half.
5.  Sprinkle the dough circles that have the centers cut out with the vanilla sugar.  Bake cookies for 10 to 12 minutes or until golden brown.  Let cookies cool on cookie sheets for 1 minute.  Transfer cookies to wire racks to cool completely.
6.  Spread bottoms of the solid cookies with about 1 1/2 teaspoons of the vanilla cream cheese frosting.  Top each with one of the cookies with the center hole, sugar side up.  Refrigerate filled cookies to store.  MAKES 24 SANDWICH COOKIES.

VANILLA CREAM CHEESE FROSTING
In a medium bowl stire together 6 ounces cream cheese, softened; 1/4 cup powdered sugar;and 1 teaspoon vanilla extract until smooth.

*GROUND VANILLA BEANS should not be confused with vanilla powder.


Wednesday, January 27, 2010

Fabric Covered Magnetic Board


Since I was getting tired of peeling scotch taped artwork off the sides of my cabinets, I decided to give them a cool place to hang it up without making me completely insane using all my tape. They really got into it and helped me pick out a cool fabric and the paints for the magnets.  Now let's hope they use it.  On second thought, they have to, I'm hiding the tape.


Materials:

1.  Galvanized metal from the home improvement store (in the roofing section).  Aluminun will not work.  We carried a magnet with us in the store to see which would work.  It came in a roll.
2.  Tin snips to cut the sheet metal (scissors did work on it, but were much harder to maneuver)
3.  Leather gloves, the metal is SHARP
4.  Fabric
5. Picture frame
6. Magnets (found in the wedding aisle at JoAnne's
7. Small wooden finials (found also at JoAnne's)
8. Glue (used my glue gun)
9.  Acrylic paints
10.  Spray laquer

Instructions:
1.  Glue the finials onto the magnets


2. Paint the finnials, when dry spray with clear finish (I used laquer)


3. Cut the metal using your picture frame glass or backing as a template
4.  wrap the fabric around the metal and hot glue


5.  Put it inside the frame and replace backing on the frame
....and your done!

Linking up to the following parties: