Friday, January 29, 2010

Making a "Super Kid" Happy

This week one of my daughters is "Super Kid of the Week" at preschool.  This is a big deal dontcha know?  This week I also bought the new BHG magazine with these cute little cookies on the cover.
They sounded simple enough.  I didn't have a couple of things...one being the fluted edge cookie cutter so I just used a drab ole round one.  The other thing I didn't have was ground vanilla beans so I just scraped the beans out of a pod and also used vanilla extract on top of that.  Because she is super kid I thought that stars would be fun in the middle and I just so happended to have a 1" star cookie cutter from Christmas.   I'll post the recipe below, but honestly I didn't like making these.  The dough is really crumbly and hard to work with, the bottom cookies that are just plain ole circles ended up larger than the cutout cookies and since you are supposed to sandwich them together that doesn't work out too well.  I ended up having to literally cut the bottom cookies around their edges to make them work. 

But...........despite all of this, when they were complete, my daughter was over the moon happy with them.  I got a huge thank you and a big hug.  She cannot wait to take them school to give to her friends, along with about 10 things for show and tell.  It made it all worth it (but not so worth it that I wouldn't just buy a couple of rolls of sugar cookies next time :))


..for a little side fun, my little man just turned 4 months old the other day and I found a cute way to remember it.  Just making good use of my PB Pillows

Vanilla Dessert Sandwiches
(courtesy of Better Homes and Gardens)

Prep: 45 min  Bake 10 Min Per Batch
Chill: 30 Min.  Oven: 350 F
3 Cups unbleached all-purpose flour
2 tsp. cream of tartar
1 tsp. baking soda
1/2 tsp. salt
1 Cup unsalted butter, softened
1 1/2 Cups granulated sugar
2 Tbsp. milk
1 Tbsp. vanilla extract
1 tsp. pure ground vanilla beans* or 2 tsp. vanilla extract
   Vanilla sugar (scrape vanilla beans and put pods in sugar jar, store indefinitely)
1 recipe Vanilla Cream Cheese Frosting (below)

1.  In a medium bowl whisk together flour, cream of tartar, baking soda, and salt.  Set aside.
2. In a large bowl beat butter with an electric mixer on medium speed for 30 seconds.  Add granulated sugar and beat until smooth and creamy.  Beat in milk, vanilla, and ground vanilla. Beat in as much of the flour mixture as you can with the mixer.  Stir in remaining four mixture by hand.  Dough will be soft.
3.  Divide dough in half.  Cover and chill dough about 30 minutes or until easy to handle.  On lightly foured surface, roll half the dough at a time until 1/8 inch thick.
4.  Preheat oven to 350 degreesF. Using a 3-inch round cookie cutter, cut out circles from dough.  Using a 1-inch round cookie cutter, cut out circles from the centers of half the dough dircles.  Place dough circles on parchment paper-lined cookie sheets.  Reroll scraps, including the 1-inch dough rounds, and cut out additional dough circles as directed.  Repeat with the remaining dough half.
5.  Sprinkle the dough circles that have the centers cut out with the vanilla sugar.  Bake cookies for 10 to 12 minutes or until golden brown.  Let cookies cool on cookie sheets for 1 minute.  Transfer cookies to wire racks to cool completely.
6.  Spread bottoms of the solid cookies with about 1 1/2 teaspoons of the vanilla cream cheese frosting.  Top each with one of the cookies with the center hole, sugar side up.  Refrigerate filled cookies to store.  MAKES 24 SANDWICH COOKIES.

VANILLA CREAM CHEESE FROSTING
In a medium bowl stire together 6 ounces cream cheese, softened; 1/4 cup powdered sugar;and 1 teaspoon vanilla extract until smooth.

*GROUND VANILLA BEANS should not be confused with vanilla powder.


Wednesday, January 27, 2010

Fabric Covered Magnetic Board


Since I was getting tired of peeling scotch taped artwork off the sides of my cabinets, I decided to give them a cool place to hang it up without making me completely insane using all my tape. They really got into it and helped me pick out a cool fabric and the paints for the magnets.  Now let's hope they use it.  On second thought, they have to, I'm hiding the tape.


Materials:

1.  Galvanized metal from the home improvement store (in the roofing section).  Aluminun will not work.  We carried a magnet with us in the store to see which would work.  It came in a roll.
2.  Tin snips to cut the sheet metal (scissors did work on it, but were much harder to maneuver)
3.  Leather gloves, the metal is SHARP
4.  Fabric
5. Picture frame
6. Magnets (found in the wedding aisle at JoAnne's
7. Small wooden finials (found also at JoAnne's)
8. Glue (used my glue gun)
9.  Acrylic paints
10.  Spray laquer

Instructions:
1.  Glue the finials onto the magnets


2. Paint the finnials, when dry spray with clear finish (I used laquer)


3. Cut the metal using your picture frame glass or backing as a template
4.  wrap the fabric around the metal and hot glue


5.  Put it inside the frame and replace backing on the frame
....and your done!

Linking up to the following parties:

Monday, January 25, 2010

What to make of this?

I found this the other day at a thrift shop.  I know that it's a lamp, or at least it's supposed to be if it actually had all of it's pieces, but it seems to have been stripped naked the poor thing.  It's very heavy, solid wood I am guessing.  I was drawn to it's cool shape and vintage keyhole.  Just reminded me of an old piece of furniture.  It has absolutely no markings on it.  I have no idea if it will look good when and if I put it all back together and put a shade on it but for $1.00 I had to give it a try.  I have even considered trying to take the base and the top screw portion off and using just the "urn-like" portion as a decorative piece...maybe do an antique finish on it in black or ivory.

What would you do with it?  Paint it?  Keep it in it's current condition?  Toss it to the curb? It does have a good crack down the length of it, but nothing is loose or anything and it really isn't super noticeable.

Right now it's actually on top of my kitchen cabinets and it looks like an urn up there from far away.


I want to hear your thoughts!

White Chicken Chili

White Chicken Chili

Mmmmm, one of my top 3 fav soups!


The Ingredients:


(not pictured: garlic, oregano, cayenne)

1 Tbsp Olive Oil
1  Med Onion Chopped
1  Can Green Chilis diced
1-2  Cloves of Garlic minced
1 Tbsp Ground Cumin (I use about 2 1/2 Tbsp because I love a strong Cumin taste!)
1 tsp Dried Oregano
1/4 tsp. Ground Cayenne Pepper
1 32 Oz box of Chicken Broth
3-4 Cans of white, Pinto, black beans or a combination of all three
2 Cooked Chicken breasts diced
1/2 Cup Cream
2 Tbsp Flour

Directions:

1.  Heat oil in a large saucepan over Med heat, add onion and sautee for 2-3 minutes until tender.
2.  Add Chicken, Chilis, Cumin, Oregano and Cayenne pepper sautee another 1-2 minutes
3.  Add Chicken broth and bring to a boil
4.  In a small bowl combine flour with some of the soup broth until smooth and add back to pan and bring to a boil
5.  Rinse and drain beans, reserve 1 can of beans to puree or mash, add the remaining beans to the pan.
6.  Add pureed beans to the pan and stir
7.  Just before ready to serve, add 1/2 cup cream (I use fat free half and half) to the pan and let warm up (NOT BOIL)
8.  Serve with a dollop of sour cream, shredded monterey jack cheese, and chopped green onions

Notes:
1) Roasted corn is also good in this soup (...or frozen...or canned)
2) Diced jalepeno can be added as well as another can of chilis to spice it up a bit

Enjoy!

K

Saturday, January 23, 2010

Thrift Store Clock to Mirror Transformation

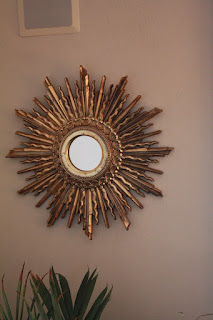
Found this little goodie at the thrift store last week.  I did like the clock however I didn't need a clock, I wanted a mirror so I removed the clock and put in a mirror.  I didn't even clean it up, I sort of like it's chippy tarnished-ness.  I may however give her a sparkly new coat of paint some day but just not today.  My living room (you know the room nobody really sits in?) is sort of lacking and this perks it up just a bit.

The best part?
$3.00 for the clock
$ .99 for the mirror


The before:

AFTER:


Linking up to the following parties:


Sunday, January 17, 2010

Copycat Pottery Barn Number Pillow Covers

This was a challenging craft for me for the simple fact that it involved my sewing machine.  In the past her and I have had issues, meaning we haven't exactly seen eye to eye.  I think she hates me but I brought her out anyway and I begged her tried to make peace with her.  Apparently shes feeling a little neglected so I sucked it up and promised to bring her out more often.  I think it worked because I had a lot of fun with her and hope to bring her out again soon.   So back to my project, I really liked the look of the Pottery Barn number pillow covers but really didn't want to shell out $99 for them so off I went to try and recreate them.  Mine do not have the definition on the back which I do think is really cute but since I saved over $80 I think I can live without them.

Warning: Long post of instructions so if you just want the "after", scroll to the bottom.
The inspiration:


(Pottery Barn)                                                                                                    (Pottery Barn)


(Pottery Barn)
Tools:

1. Approx 2 1/2 yds of fabric (I used cotton/linen) for four 18" pillows
2.  Fray Check
3.  Black Fabric Paint
4.  Freezer Paper (MUST be freezer paper, smooth on one side, waxy on the other... DO NOT use wax paper)
5.  Sewing Machine (although this is optional since many of you make pillow no-sew pillow covers)
6.  Iron


Step 1:   Cut the fabric

 I cut the fabric to approx 21 inches square and applied fray check to the edges so they wouldn't...well....fray.  I let them dry according to the directions on the bottle.  You'll  want to wash the fabric after this has dried  to allow for shrinking.


Step 2:  Making the stencil

I first printed out the number using font 'Engravers MT' in Microsoft word.  I printed it using font size 750 (as large as I could get it printed on 8 1/2 x 11 paper).  Next I took that print out and scanned it on my printer and allowed it to fill the page.  The number ended up being 9 1/4" tall and 7 1/4" wide.  You could also take your printout to a copy machine or printing company and have them enlarge the numbers for you.  After I printed out my large numbers, I taped the page down to the smooth side of a piece of freezer paper and cut out just the number.  You can then remove the printer paper from the freezer paper.  Keep the freezer paper, toss the printout.


Step 3:  Mark, Pin and Sew Pillow Covers

You can skip this step if you already know how to make your own pillow cover...no sew or otherwise. I laid two fabric pieces together wrong sides out and measured in 1 inch from each side and traced a straight line all around making my sewing line 19 inches square.  I used a pencil since it's the inside of the pillow. Those of you that sew are probably cringing right now that I used a pencil.  It's not like it was a sharpie or anything.  I then pinned the two layers together and sewed three sides of the pillow cover closed, leaving one side open, because...duh you have to get a pillow in somehow.  I say this because I was flying along with my first pillow and realized I had sewn 1/4 of the 4th side shut! 
.

Step 4:  Iron on the Stencil

I first ironed the fabric (use the correct setting for whatever fabric you are using), then I laid a square sheet of freezer paper approx the size or larger than the stencil itself waxy side up between the fabric layers then center the stencil on the top layer of the fabric waxy side down.  Iron over the stencil until it is nicely adhered to your fabric (cool huh???).  I loved this part!  The freezer paper in between the fabric layers isn't entirely needed, but it does come in handy when you paint the fabric as it keeps the paint from bleeding onto the other side of the fabric.  Really it's just an added layer of security.


Step 5:  Painting

For the painting, I used black fabric paint diluted just a little bit with water to make the black...well...a little less black.  I used a sponge paint brush to apply.  I also slipped a piece of cardboard in between the layers of fabric to make it a bit sturdier to paint on and to be sure my paint wouldn't bleed anywhere even though I had the freezer paper in place. 


UGGGHHH...and no matter how good I try to be with the paint, my stupid finger had a little bit on it and I touched the number 3 pillow.  Darn finger.

Step 6:  Add pillow form and sew shut

I used my four couch pillows that I already had to fill my covers.  Once inside I just pinned the opening closed and ran it along the machine.  It won't be super easy to rip the stitches when I want to change them, but quite honestly I do not have the time nor the patience to hand stitch these closed.  It's definitely not perfect, but it was fast  :)


Voila!  4 new pillows for only a few dollars each!


I am linking up to:


The DIY Showoff - Show and Tell Week
Funky Junk Interiors - Sat Nite Special
Cottage Instincts - Make it for Monday
Between Naps on the Porch - 53rd Metamorphosis Monday
The Persimmon Perch - Made it Monday
Twice Remembered Cottage - Make Your Monday
Blue Cricket Design - Show and Tell
The Thrifty Home - Penny Pinching Party
The Shabby Chic Cottage-Transformation Thursday
Finding Fabulous - Frugalicious Friday


Friday, January 15, 2010

Mantel Party

Because I love a good party, I'm linking up to The Mantel Party over at Stories of A to Z


Now...understand that my Mantel is in a "transition" phase right now so I'll explain what is going on here...

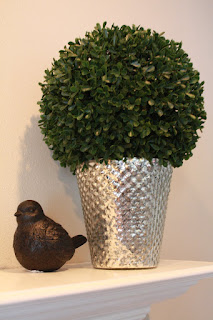
I keep adding to it without really getting anywhere yet.  I found the mercury vases at Pottery Barn on sale and then ordered some boxwood balls with intentions of making a topiary, however I think that the balls are a little too large so I am waiting for the smaller ones that I ordered to arrive. In the meantime they just rest on the vases.  I decided to keep them in hopes of finding another home for them because I just adore boxwood anything!  I am also getting a little bored with our mirror and am always on the lookout for something a little lighter in color and maybe a different shape to take us through spring and summer. Since this little party happens every week I figure I can share it's evolution.


Wednesday, January 13, 2010

Little White Vase Makeover

I know it's still winter and all, but I just cannot get into anymore winter decorating so along with my Christmas decorations went the winter things too!  Spring is slowly blooming in this house.  I had a little fun with a pretty paint color (Krylon - blue ocean breeze) and a plain white vase.  I looove orange flowers too and I'm really liking these two colors together.  I don't know yet though if it'll go behind my sink beside the wire cage or up on the mantel.  Neither is really 100% decorated right now just sort of thrown together so I'm sure I'll be changing it 6457   a few times before spring even hits.  Not even sure if it's a good idea to spray paint in 20 degree weather, but I did it and it worked out fine but definitely wouldn't recommend for any large pieces.

BEFORE:


AFTER (behind my kitchen sink):


AFTER (on my mantel):


Hopefully whereever they end up they'll bring cheer, I think they're just so happy looking.

Linking to:

Monday


Wednesday


Sunday, January 10, 2010

Desk challenge completed (a.k.a memo board)

I finally completed the memo board!  I have to say it's definitely growing on me.  I wasn't certain about it when it first went up because I think it's too poofy...like a headboard.  The outlets came through fine too.  You can still see things plugged in but unless I have it completely rewired that is just the way it is.  I think this is definitely an improvement.  Look!  More paperwhites!  You should all see when I start to pull out the Tulips!  I'm crazy for Tulips!

Desk Before:


And the desk after (Please ignore the cubbies....that still needs to be dealt with)


I am linking to:
and

DIY Paperwhite arrangement...and a little Brie on the side

I have had these paperwhites for a few years now and have been meaning to do something with them.  While we were organizing and purging our basement I came across some black rocks, a shallow bowl/vase and a bottle of wonder water.  I've used wonder water before and really like it.  I needed a new arrangement for our new coffee table and I thought these would work out great since it's almost spring.  What??  I know, "almost" is a stretch isn't it.  It's actually pretty easy to put together one of these displays, it's hard to believe that they sell for so much at some places.

I ended up using one and a half bottles of wonder water

I followed the directions and heated up a pan of water to 130 degrees and laid both bottles into the pan for approx 20-30 minutes or so until it was liquified.


Once it was liquified, I poured them over the rocks in my vase/bowl.  I also placed the bowl into a dish of warm water.  This is also in the directions, it helps to get rid of air bubbles in the liquid.  I let it sit for 30 min (according to the directions on the wonder water).  Once it had set for 30 min I placed the paperwhites where I wanted them and used scotch tape as a grid to hold them in place.  I saw this once on The Barefoot Contessa show on Food Network.  Ina has that great friend who owns a flower shop, you know what I'm talking about?  Right, so anyway it worked out very well although I had a little fight with the tape (no worries...I won) so it looks a little less than desirable.


Unfortunately the flowers are a little heavy and due to the shallow nature of the bowl, the tape just didn't seem strong enough to me so I also added a string to hold them together.


The directions say that it should harden in a few hours but I left mine set overnight.  I removed the tape and voila...a nice little arrangement.  I noticed that one stem is leaning a little bit, but the great thing about wonder water is that you just heat it up and you can re set them!


Now....just to show you how easy it is..I will have you know that I also made this while creating the arragement.  Sinful, but oh so good for dinner with some wine.  Dried Cherries, Pecans & Rosemary Brie En Croute.  I'll share the recipe below.


Dried Cherries, Pecans & Rosemary Brie en Croute

Ingredients

1/2 of a 17.3 ounce package Puff Pastry (1 Sheet)
1 Egg
1 TBS water
1/3 cup dried cherries, softened*
1/4 cup chopped toasted pecans
1/4 cup honey
1/2 tsp chopped fresh rosemary or 1/8 tsp dried rosemary leaves crushed
1 13.2 oz Brie cheese round

Directions

Thaw the pastry sheet at room temperature for 40 minutes or until it's easy to handle.  Heat the oven to 400 degrees F.  Beat the egg and water in a small bowl with a fork.

Unfold the pastry sheet on a lightly floured surface.  Roll the pastry sheet into a 14-inch square.  Stir the cherries, pecans, honey and rosemary in a small bowl.  Spread the cherry mixture into the center of the pastry square.   Slice the rind off of one whole side of the Brie (this will be the top).  Put the cut side of the brie down on top of the cherry mixture.  Brush the edges of the pastry with the egg mixture.  Fold two opposite sides of the pastry over the cheese.  Trim the remaining two sides of the square to 2 inches form the edge of the cheese and press the edges to seal.  Place the pastry wrapped cheese seam side down onto a baking sheet.  Brush the pastry with the egg mixure.

You can decorate the top with the scraps of pastry or additional rosemary if desired.  Brush with egg mixture.

Bake for 20-25 minutes or until the pastry is deep golden brown.  Let stand for 45 minutes-1 hour.  Serve with crackers or bread.

*To soften cherries, mix the cherries and 1/2 cup hot water in a small bowl.  Let stand for 1 minute.  Drain and pat the cherries dry.